Category Archives: Uncategorized

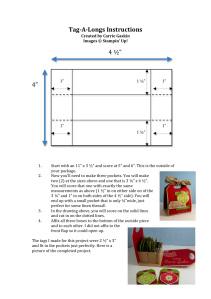
Tag-A-Longs Instructions

I think this is a really clever project and what a nice gift to give to someone. I love receiving handmade things, it just means so much more that someone took the time to create a gift for me with their own two hands.

Artistic Avenger

Thanks so much for all your extremely kind comments about the Tag-A-Longs set. It was very much fun to make and I hope you have fun making it too! So, I put together a little PDF with instructions and sizes. I’d love to know if you find it easy-to-follow because now that I know what I’m doing I could do a few more of these!

Just click on the schematic picture to get your very own copy of the PDF.

And, thank you again for asking!

View original post

New Year, new Blog name!

Happy New Year to all my blog followers! Can you believe it’s 2013 already? I’m still getting used to the idea myself. I decided to start 2013 with a new name for my paper crafting blog, hence the change from “Stampers Studio” to The Paper Garden. The original posts are still in this blog, but I’ll be adding some new content soon so be sure to come back and check it out!

New Card for Spring!

Posted on
Hello to all my Stamping Friends!

Well, so much for posting more often! LOL I’ve been working outside the house since February and although the extra money has been good for my stamping purchases, it hasn’t left me much time to create any cards or update my blog. I’m a little slow anyway because I only started making cards last November and this is only the third card I’ve “created.” Anyway, I managed to finish this card on the weekend and I’m pleased to show it to you!

NOTE: All products are from Stampin’ Up!
The card front was inspired by a card created by Michelle Reynolds, another Stampin’ Up! Demonstrator. I changed it up a bit because I didn’t have all the same supplies she used, but I’m happy with the end result:
Card Front
  • Colours: Wisteria Wonder, So Saffron, Whisper White and Very Vanilla card stock (CS). Wild Wasabi Subtles DSP (for striped “ribbon” and eyelet border in centre of card).
  • Stamp Sets: Fresh Vintage and Teeny Tiny Wishes “Just for you” (on the tag). All stamps were coloured directly on the stamps with Stampin’ Write Markers using So Saffron, Wild Wasabi and Perfect Plum for the flowers and Basic Black for the lettering.
  • Embossing Folder: Textured Impressions Elegant Lines (on Whisper White CS).
  • Punches: Blossom (to punch out largest stamped image as well as the accents on each petal),  1 3/8″ Circle (for single stamped flower), 1 3/4″ Scallop (for accent on single stamped flower), Tag – extra large and large tag (for tag), Eyelet Border (scalloped accent in centre of card).
  • Paper Piercing tool, mat and template used for accents on So Saffron CS.   
  • Hemp Twine bow on tag.
  • So Saffron Brad was added to the centre of the large Blossom punch flower and Tombo Mono Multi  glue was used to attach the flower to the card.
  • Scallop circle and tag were attached to the card with Stampin’ Dimensionals

You know, I really do have a hard time leaving the inside of my cards blank. It may take a bit longer, but I always try to make the inside just as pretty as the outside. So, what do you think?

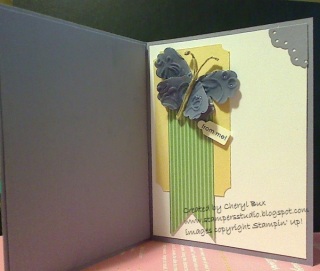
Card Inside
Here, I continued the colours from the outside of the card and added a butterfly (created using the Blossom punch and embossed with the Textured Impressions Elegant Lines Embossing Folder). I just love butterflies! The butterflies “body & antennae” was created using Hemp Twine and the top of the butterfly wings were covered with Crystal Effects to make it shiny (hard to see in this photo but it’s very pretty). I see butterfly pins in my creative future! LOL The butterfly was attached to the card with Tombo Mono Multi glue. I used part of the image on the stamp “for you from me” from the set A Word for You (coloured with Basic Black Stampin Write Marker) and then cut the words out using the Jewelry TagStampin Dimensionals were used to attach the tag to the card. I put a little Eyelet Border accent piece on the top right corner to…. hide an ink “booboo” that transferred from my work table to the card. I like to call these “Happy Accidents”! Always nice to know you can cover mistakes easily when they happen.

Thanks for stopping by!
Summer Smooches Promo – ON NOW!

Posted on
See, this is my second post for the month of April! LOL Well, it’s a small improvement anyway.
Want a SNEAK PEAK of some of the new coordinating products from the upcoming 2012-2013 catalogue? This is a great opportunity to sample some of the exciting new products coming your way in June, when the new 2012-2013 Catalogue will be released.

Check out this promo by clicking on the Summer Smooches picture on the right, then shop online with me 24/7 via my demonstrator website today!

I’ve been a "Bad Blogger"

Posted on

Yup, that’s me….I’m a bad blogger. Don’t get me wrong, I love to blog, but I haven’t had much time lately to do it faithfully. I started working on-call two months ago, so I’ve had even less time to blog, but I must say that the extra money has helped to support my stamping habit! LOL So please excuse my lack of posts (where did March go – ugh)! I’m working on getting better organized so that I will be a better blogger in the future!

Packed for Baby Stamp


Outside
Don’t forget to add some details to the inside of cards too!

I created this card for a customer using the Packed for Baby stamp on page 39 of the Occasions Mini Catalogue. One of the things I really like about this stamp is that you can use it as one big block (as shown) and you can also use each image as an individual stamp too – just by colouring only the image you want! First, I stamped the entire image and coloured it with Stampin’ Write Markers. I then stamped the bib again on a separate piece of cardstock, coloured it, cut it out and attached it over the first image with some stampin’ dimensionals so it pops out. This technique is called “spotlighting.” If you’d like to learn how to do this technique and more, watch for details of my beginners stamp class starting in March!

Workshop Hostess Gift

This is the hostess gift I created for my very first Stampin’ Up! Workshop last month. There are actually four 3 x 3 notecards (two shown) that fit inside the bag. The bag was made using the Big Shot and the  Fancy Favor Bigz XL Die (Item #115965), which is exclusive to Stampin’ Up! The patterned paper I used is called Everyday Enchantment Designer Series Paper and the butterfly brad and organza ribbons coordinate perfectly – all three items are in Stampin’ Up!’s 2012 Sale-a-bration mini catalogue.

Sale-a-bration runs from January 24 thru March 31, 2012 and for every $60 CAD purchase you can earn a Sale-a-bration item FREE! Check out the Sale-a-bration catalogue on my demonstrator website under the promotions tab and place your order TODAY!

The Paper Garden

Where Creativity Blooms!

WordPress.com News

The latest news on WordPress.com and the WordPress community.